Step-by-Step Guide: How to Take Region Selection Screenshots on Your Device
Step-by-Step Guide: How to Take Region Selection Screenshots on Your Device
Action Tutorials
Installation, activation and updates
Capture screenshots of selected desktop region with Mirillis Action!
Share this tutorial:
Introduction
With Mirillis Action! you can easily capture screenshots of selected Windows desktop region. Just press a button and screenshots of your selected desktop region will be saved directly to JPG, BMP or PNG format.

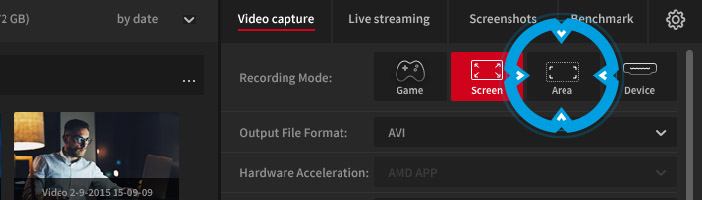
Select Active desktop region mode
To capture screenshots of selected Windows desktop region please select “Active desktop region/area” recording mode.
Adjust region size and position
Use mouse to adjust your region size and position. You can precisely control region size and position with keyboard: use arrows to move region, use SHIFT + arrows to resize region. Green region frame indicates that region is accepted and Action! is ready to capture screenshots. Gray frame indicates that current region is not accepted and you cannot capture screenshots.
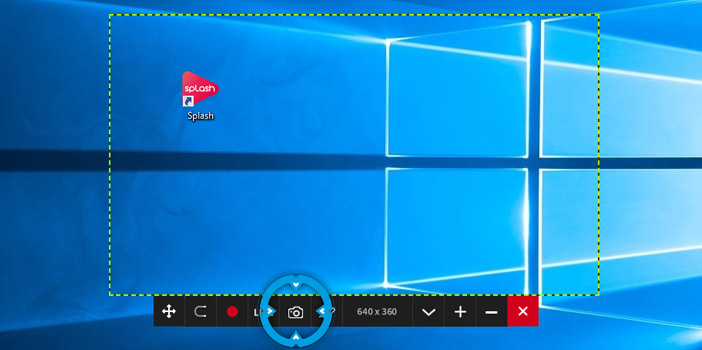
Capture screenshot
Press capture screenshot icon or press F12 (default hotkey) on keyboard to capture a desktop region screenshot. The desktop region screenshot will be saved directly to selected format (JPG,BMP or PNG).

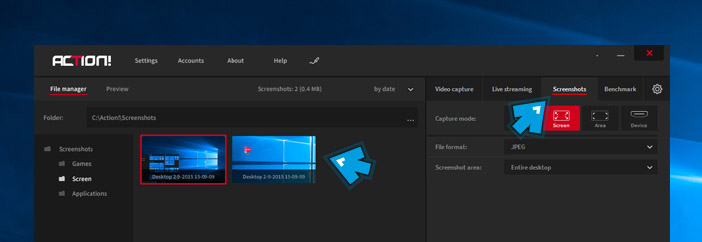
Screenshots and settings
Close “Active desktop region/area” recording mode to show main Action! window. Select “Screenshots” tab to check the list of your screenshots, double click on the screenshot thumbnail to open screenshot preview.
Settings: File format
Allows to select one of available output file formats: BMP, PNG, JPG.
Settings: Screenshot area
For multi-display setups it is possible to select to capture a screenshot from all desktops or from a single desktop only. This option works only for Active desktop recording mode selected in Video Capture/Recording tab.
Also read:
- [Updated] Streamline Your Songs on Youtube Platform
- 2024 Approved From Bottom to Top Seo Guide for Podcasters
- ABBEYY Survey Finds Over 40 Working Days a Year Used by UK Staff in Non-Automatable Jobs – A Call to Embrace Robotic Efficiency
- Android's Top Video Recording Options - 5 Excellent Picks
- Choosing Your Viewing Experience: Diving Into the Perks and Limitations of Hulu and Hulu+
- Get Started Now: Comprehensive Action Software User Guide
- How to Change your Motorola Moto G Stylus (2023) Location on Twitter | Dr.fone
- In 2024, How To Unlock iPhone 6 Official Method to Unlock Your iPhone 6
- Massive Downtime: How and Why Microsoft 365 Suffered Widespread Issues Affecting Users Worldwide | DigitalDigest
- Mastering File Protection: Step-by-Step File History Setup in Windows 10 and 11 - Tips From ZDNet
- Microsoft Boosts Employee Creativity with Enhanced Teams Features – Insights From ZDNet
- Microsoft Claims Engineers' Adoration for Windows 11: Exploring the Tech Community's Favorite OS
- Singapore Legal Tech Set to Adopt Microsoft Copilot: An Exclusive Insight
- The Arrival of Groundbreaking Windows on ARM Applications - Why It Matters | Tech Insights
- The Ultimate Selection of Homework Assistance Apps for Young Learners
- Top 5 Mac OS Sierra Video Editing Apps
- Title: Step-by-Step Guide: How to Take Region Selection Screenshots on Your Device
- Author: Andrew
- Created at : 2024-10-06 16:18:41
- Updated at : 2024-10-11 17:00:20
- Link: https://win-latest.techidaily.com/step-by-step-guide-how-to-take-region-selection-screenshots-on-your-device/
- License: This work is licensed under CC BY-NC-SA 4.0.